Are you tired of paying high prices for massage tables that don’t quite fit your needs? Imagine having a custom-made massage table designed just for you—without breaking the bank.
Building your own massage table can be easier than you think, and it gives you full control over its size, comfort, and style. You’ll discover simple steps and expert tips to create a sturdy, comfortable massage table right at home.
Keep reading to unlock the secrets that will save you money and boost your massage experience like never before.
Benefits Of A Diy Massage Table
Building your own massage table brings many benefits. It offers more than just a place to work. A DIY massage table saves money and suits your exact needs. It also gives a sense of pride and joy. This section explores these advantages in detail.
Cost Savings Compared To Store-bought
Buying a massage table can be expensive. A DIY table cuts costs significantly. You choose affordable materials and avoid brand markups. This makes a quality table possible on a smaller budget. Saving money allows for spending on other important tools.
Customization To Fit Personal Needs
A homemade table can be made just for you. Adjust the height, width, and cushioning to match your comfort. Add features you want, like extra padding or storage. This ensures better support for clients and easier use for you. Custom tables fit your style and work habits perfectly.
Satisfaction Of Building Your Own
Creating your own massage table is rewarding. It feels good to use something you built with your hands. Each step teaches skills and boosts confidence. The table becomes more than furniture—it becomes a personal project. This satisfaction adds value to your massage work.
Materials And Tools Needed
Building your own massage table starts with gathering the right materials and tools. The quality of wood and hardware affects the table’s strength and comfort. Having proper tools makes assembly easier and safer. This section breaks down what you need to get started.
Choosing The Right Wood
Select wood that is strong and light for easy moving. Pine and poplar are good budget choices. Hardwood like oak or maple offers more durability. Wood should be smooth and free of cracks or knots. Proper wood ensures a stable and long-lasting table.
Essential Hardware Components
Hardware holds the table parts securely together. You will need screws, bolts, and brackets. Use stainless steel or coated hardware to prevent rust. Hinges help fold or adjust the table. Add rubber feet to stop slipping and protect floors.
Tools For Assembly
Prepare basic tools to build the table with ease. A drill and screwdriver are essential for fastening screws. A saw helps cut wood to the right size. Sandpaper smooths rough edges for safety. A measuring tape and pencil ensure accurate cuts and holes.
Designing Your Massage Table
Designing your own massage table is a rewarding project. It gives you control over size, comfort, and style. A well-designed table supports both the client and the therapist. Thoughtful choices make the table safe and relaxing. Focus on key elements to create a perfect fit for your needs.
Start by understanding the basics. Size, adjustability, and padding are essential. These factors impact comfort and usability. Plan carefully to build a sturdy, comfortable massage table.
Standard Dimensions To Consider
The right size is important for comfort and function. Most massage tables are about 28 to 30 inches wide. Length usually ranges from 72 to 76 inches. Height should be adjustable or set between 24 and 34 inches. This range suits most body types and massage styles. Keep the table stable with a strong frame. Measure your space before building to ensure a good fit.
Adjustable Features For Comfort
Adjustable parts make the table more flexible. Legs with height options help match therapist height. A tilting headrest allows clients to relax their neck. Armrests or side supports add extra comfort. Use easy-to-operate mechanisms for quick changes. These features improve the massage experience for everyone. Make sure adjustments are secure and stable.
Selecting The Padding And Upholstery
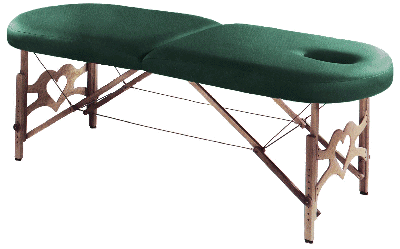
Padding affects comfort during long sessions. Use high-density foam for firm support. Two to three inches thick padding works well. Choose upholstery that is soft and easy to clean. Vinyl or PU leather are good options. These materials resist stains and wear. Pick colors that fit your style but hide dirt. Proper padding and cover increase client satisfaction.
Step-by-step Building Process
Building your own massage table can be a rewarding project. Follow these simple steps to create a sturdy and comfortable table. Each phase focuses on clear actions to guide you easily through the process. Prepare your tools and materials before you start.
Cutting And Preparing Wood Pieces
Begin by measuring and cutting the wood according to your table size. Use a saw to cut the main frame pieces first. Sand each piece to smooth rough edges. This step ensures safe handling and a neat finish. Label the pieces to keep track of their place in the assembly.
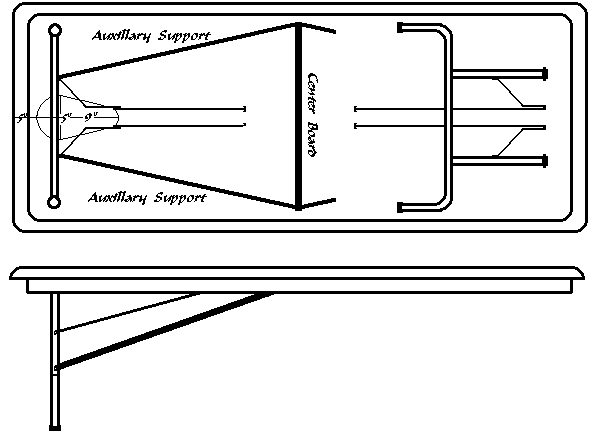
Assembling The Frame
Join the cut wood pieces to form the frame. Use wood glue and screws for strong joints. Check that the frame is square by measuring the diagonals. Tighten all screws to secure the frame. A solid frame supports the entire table and weight.
Adding Legs And Support
Attach the legs to each corner of the frame. Use sturdy screws and brackets for extra strength. Add cross supports between legs to prevent wobbling. Ensure the legs are the same length for a level table. Test stability before moving to the next step.
Attaching The Cushion And Cover
Cut foam padding to fit the table top. Use spray adhesive to fix the foam on the wood. Cover the foam with a durable fabric or vinyl. Secure the cover underneath the table with a staple gun. Smooth out wrinkles for a comfortable surface.
Finishing Touches
Finishing touches make your DIY massage table strong, smooth, and useful. These small steps improve the look and feel of the table. They also add practical features that make using the table easier. Focus on three key areas for the best results.
Sanding And Sealing Wood
Sanding the wood removes rough spots and splinters. Use fine sandpaper for a smooth surface. This step makes the table safer and more comfortable.
Sealing the wood protects it from moisture and stains. Choose a clear sealant or varnish. Apply two or three coats for strong protection. Let each coat dry fully before adding the next.
Adding Foldable Mechanisms
Foldable parts make the table easy to store and carry. Use strong hinges or folding brackets. Attach them carefully to support weight and movement.
Test the folding parts to ensure they move smoothly. Tighten screws and bolts as needed. A well-made foldable table saves space and adds convenience.
Incorporating Storage Options
Storage adds value and keeps tools close by. Build small shelves or drawers under the table. Use simple designs for easy access and good support.
Consider adding hooks or straps on the sides. These hold towels, oils, or other massage supplies. Organized storage helps keep the workspace clean and ready.

Safety And Maintenance Tips
Building your own massage table is rewarding. Keeping it safe and well-maintained ensures it lasts longer. Safety and maintenance protect you and your clients during use. Follow simple tips to keep your table strong and clean.
Ensuring Stability And Durability
Check all bolts and screws regularly. Tighten any loose parts immediately. Use strong wood or metal for the frame. Avoid placing the table on uneven floors. Add non-slip pads to the legs for extra grip. Make sure the table can hold the intended weight safely.
Cleaning And Care Instructions
Wipe the surface with a damp cloth after each use. Use mild soap to remove oils and dirt. Avoid harsh chemicals that can damage the material. Let the table dry completely before folding or storing. Cover the table with a clean sheet during use. Store in a dry place to prevent mold or mildew.
Regular Inspection For Wear
Look for cracks or splits in the wood or padding. Check for tears or holes in the upholstery. Replace worn parts quickly to avoid injury. Test the folding mechanism to ensure smooth operation. Inspect the face cradle and armrests for damage. Early fixes prevent bigger problems later.
Enhancing Your Massage Experience
Building your own massage table is just the start. Enhancing your massage experience makes every session more relaxing and enjoyable. Small changes can create a calm and soothing space. This helps you and your clients feel more comfortable and cared for.
Focus on creating a peaceful atmosphere. Comfort and support are key to a great massage. These simple additions improve the overall feel and effectiveness of the massage.
Using Aromatherapy And Lighting
Aromatherapy adds a calming scent to the room. Essential oils like lavender or eucalyptus relax the mind and body. Use a diffuser to spread the aroma gently. Soft, warm lighting helps create a peaceful mood. Avoid bright or harsh lights that can cause discomfort. Dim lights or candles work well for a cozy setting.
Incorporating Adjustable Headrests
Adjustable headrests support different body types and positions. They allow clients to relax their neck and head fully. This helps reduce tension during the massage. Easy adjustments make the table more versatile. A good headrest improves comfort and client satisfaction.
Adding Extras Like Armrests And Face Cradles
Armrests offer extra support and comfort for the client’s arms. They keep muscles relaxed and reduce strain. Face cradles provide gentle support for the face and neck. They help clients breathe easily while lying face down. These extras enhance comfort and make the massage feel more professional.
Frequently Asked Questions
What Materials Are Needed For A Diy Massage Table?
You need sturdy wood, foam padding, durable fabric, screws, and hinges. Quality materials ensure stability and comfort. Choose lightweight wood for easy transport. Foam thickness affects client comfort. Fabric should be strong and easy to clean.
How Long Does It Take To Build A Diy Massage Table?
Building a DIY massage table typically takes 4 to 6 hours. Time depends on your experience and tool availability. Planning and measuring carefully reduce errors and save time. Allow extra time for drying glue or paint if used.
Is Building A Diy Massage Table Cost-effective?
Yes, building your own table can save 40-60% compared to buying. You control material quality and design. This approach avoids expensive brand markups. However, consider your time investment and skill level before deciding.
How To Ensure Safety And Stability In A Diy Massage Table?
Use strong joints and quality wood to support weight safely. Test the table for wobbling or creaking before use. Reinforce legs and hinges with screws and brackets. Proper assembly ensures client and therapist safety.
Conclusion
Building your own massage table saves money and lets you customize it. The process is simple and rewarding for any skill level. You control the materials, size, and comfort features. A DIY table fits your space perfectly and meets your needs.
Plus, it gives a sense of pride and accomplishment. Try it step by step, and enjoy your new massage table soon. This small project brings big benefits for personal use or clients. Start today and feel the difference a handmade table makes.
Related massage chair reviews:
 Which Osaki Massage Chair is Best? 50 Osakis Tested and Reviewed!
 50 Best 4D Massage Chairs Reviewed by Real Customers 2026
 50 Best Ergonomic Massage Chairs Perfect for Tall Individuals Reviewed 2026
 The 45 Best Utopia 3d Massage Chair Rated for 2026
 Best Massage Chairs Under $2000: Your Relaxation Reviews for 2026
 The Best 35 Affordable Full Body Massage Chairs Under $1000 Reviewed